


Android Speech To Text Tutorial Using RecognizerIntent API
How To Integrate Speech Recognition In Android Using Recognizer Intent


Most modern note-taking, dictation, and audiobooks mobile applications use speech to text to enhance user experiences in the app.
This feature allows a user to be able to make notes using a voice note which is later converted to text automatically by the app.
Using speech saves users a good chunk of time from typing, and enables more efficient work since messages can be dictated faster than typing.
There are many ways to achieve speech to text in Android which include the following:
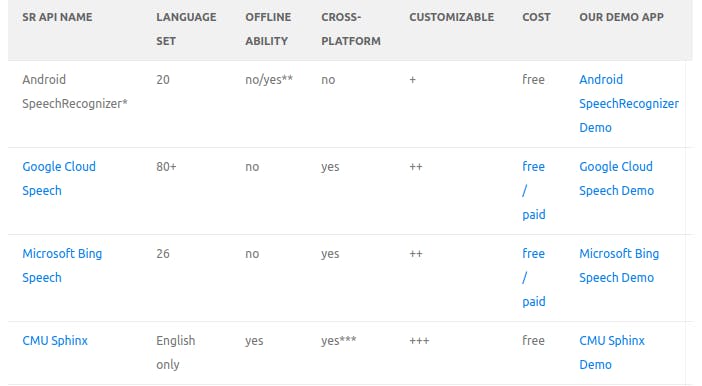
However, in this tutorial we will be using the RecognizerIntent for the following reasons:
The RecognizerIntent is easy to set up
The RecognizerIntent is a well-advanced deep learning neural network algorithms for automatic speech recognition (ASR).
Ease of customization
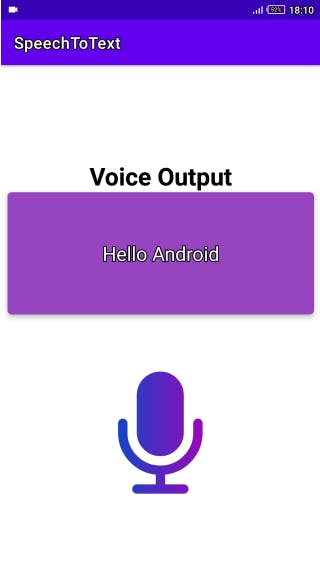
This is what we are going to build in this tutorial:
Here is a link to the GitHub repo of the project.
Tutorial Requirements
To follow this tutorial, you need the following:
- A basic understanding of the Kotlin programming language. This project is done in Kotlin (100%)
- You may also need to get the Arctic Fox version of Android studio because this project was built with it.

You do not need to be an Android expert to follow through this tutorial, just a good knowledge of Kotlin and Android basics is sufficient to follow through.
Now that we have all the requirements out of the way, let's get started.
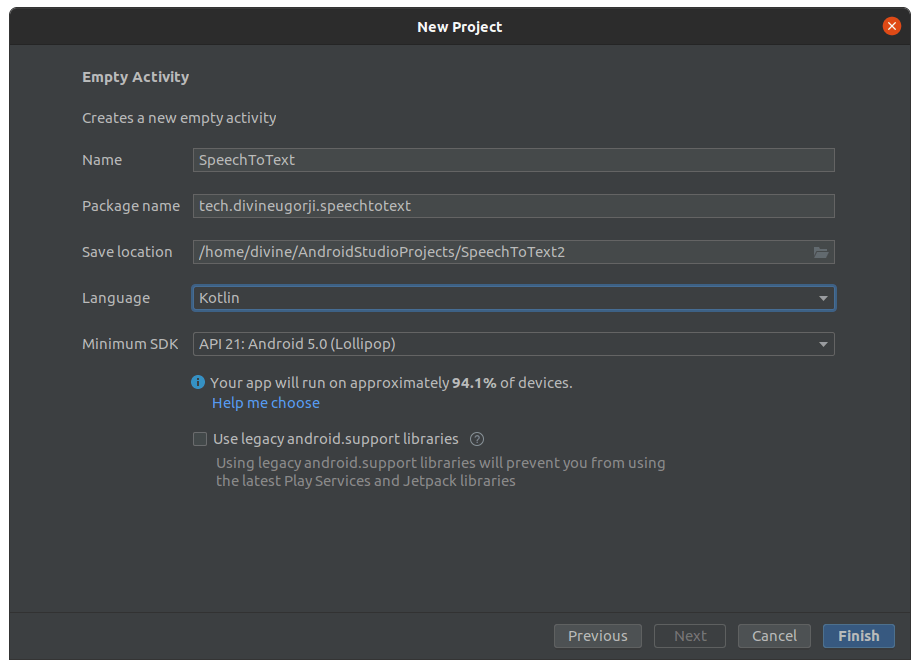
Create a new project
Follow these steps to create a new project in Android studio:
Launch Android studio
Enter the name of the project, I used SpeechToText
Choose Kotlin for the programming language,
Then choose Android version 5.0 for the minimum SDK
Setup view binding
View binding is used for view interaction in Android development. It helps you bind your Android XML views to your Kotlin or Java logic code in Android.
View binding is a replacement for findViewById since it takes care of null-safety, type safety, and compiles faster.
Once view binding is enabled in a module, it generates a binding class for each XML layout file present in that module.
To achieve view binding for this project, take the following steps:
Enable View binding in your project:
To be able to enable view binding in your project, copy the following lines of code into the module-level of your Gradle file in Android studio. Ensure to paste it in the android{} code block, then click on sync to build the project and import the neccssary dependencies for view binding.
android {
    ...
    buildFeatures {
        viewBinding true
    }
}
Configure MainActivity For View Binding:
Once view binding is enabled for a module, a binding class is generated for all classes in the module. However, the classes still need to be configured in Android studio to be able to bind their XML layouts to them accordingly.
In this project, we have only one activity class which is the MainActivity, therefore we only need to configure it for view binding.
To be able to achieve this, add the following lines of code in your MainActivity.kt file in Android studio.
 private lateinit var binding: ActivityMainBinding

override fun onCreate(savedInstanceState: Bundle?) {
    super.onCreate(savedInstanceState)
 binding = ActivityMainBinding.inflate(layoutInflater)
        val view = binding.root
    setContentView(view)
}
With this setup, we can easily interact with our app views using our Kotlin codes.
You can check out this documentation to learn more about view binding in Android.
After setting up the view binding for your project, the next step is to build up the user interface of the project using XML. Navigate to the activity_main file of your project to start building the user interface.
Build the XML layout
Our user interface for this app comprises two text views with one embedded in a card view and an image view.
To achieve this, copy the following lines of code into your activity_main XML layout file.
<?xml version="1.0" encoding="utf-8"?>
<androidx.constraintlayout.widget.ConstraintLayout xmlns:android="http://schemas.android.com/apk/res/android"
    xmlns:app="http://schemas.android.com/apk/res-auto"
    xmlns:tools="http://schemas.android.com/tools"
    android:layout_width="match_parent"
    android:layout_height="match_parent"
    tools:context=".MainActivity">

    <TextView
        android:id="@+id/voice_output_text"
        android:layout_width="wrap_content"
        android:layout_height="wrap_content"
        android:layout_marginTop="116dp"
        android:text="Voice Output"
        android:textColor="#620671"
        android:textSize="30sp"
        android:textStyle="bold"
        app:layout_constraintEnd_toEndOf="parent"
        app:layout_constraintStart_toStartOf="parent"
        app:layout_constraintTop_toTopOf="parent" />

    <androidx.cardview.widget.CardView
        android:id="@+id/cardView"
        android:layout_width="match_parent"
        android:layout_height="150dp"
        android:layout_marginStart="8dp"
        android:layout_marginEnd="8dp"
        android:backgroundTint="#5f0a87"
        app:cardCornerRadius="5dp"
        app:cardElevation="5dp"
        app:cardPreventCornerOverlap="true"
        app:cardUseCompatPadding="false"
        app:contentPadding="10dp"
        app:layout_constraintEnd_toEndOf="parent"
        app:layout_constraintStart_toStartOf="parent"
        app:layout_constraintTop_toBottomOf="@id/voice_output_text">

        <TextView
            android:id="@+id/text_output"
            android:layout_width="match_parent"
            android:layout_height="match_parent"
            android:gravity="center"
           tools:text="@string/voice_output_text"
            android:textColor="#FFFFFF"
            android:textSize="24sp" />
    </androidx.cardview.widget.CardView>

    <ImageView
        android:id="@+id/voice_button"
        android:layout_width="150dp"
        android:layout_height="150dp"
        android:layout_marginTop="70dp"
        android:contentDescription="@string/voice_button"
        app:layout_constraintEnd_toEndOf="parent"
        app:layout_constraintHorizontal_bias="0.498"
        app:layout_constraintStart_toStartOf="parent"
        app:layout_constraintTop_toBottomOf="@+id/cardView"
        app:srcCompat="@drawable/ic_voice_icon" />

</androidx.constraintlayout.widget.ConstraintLayout>
After building the user interface, it's now time to build the logic of the app.
Navigate to the MainActivity.kt file in your Android studio and paste the following lines of code.
binding.voiceButton.setOnClickListener {
            val speechIntent = Intent(RecognizerIntent.ACTION_RECOGNIZE_SPEECH)
            speechIntent.putExtra(
                RecognizerIntent.EXTRA_LANGUAGE_MODEL,
                RecognizerIntent.LANGUAGE_MODEL_FREE_FORM
            )
            speechIntent.putExtra(RecognizerIntent.EXTRA_PROMPT, "voice output")
            startForResult.launch(speechIntent)
        }
Let's break down the chunk of code for easy understanding:
First, we invoke a click listener to launch the speech recognizer by binding our image view in the XML code using the onClickListener interface and passing the ACTION_RECOGNIZE_SPEECH as a parameter. This starts an activity that will prompt the user for speech and send it through a speech recognizer.
- Then we create an intent extra and pass EXTRA_LANGUAGE_MODEL and LANGUAGE_MODEL_FREE_FORM as parameters. These help us inform the speech recognizer of the kind of language we expect as input and speech model for language processing.
- The EXTRA_LANGUAGE_MODEL informs the recognizer which speech model to prefer when performing ACTION_RECOGNIZE_SPEECH.
- LANGUAGE_MODEL_FREE_FORM informs the speech recognizer to use a language model based on free-form speech recognition.
The speechIntent.putExtra(RecognizerIntent.EXTRA_PROMPT, "voice output") provides a text the user can see when the speech recogniser prompt launched. In this case, we used "voice output". This feature is optional and can be omitted when not needed.
The startForResult.launch(speechIntent) launches the intent the speech recogniser using ActivityForResult.
The next step is to intercept the codes in the startActivityForResult and ensure the voice notes are set to the text view in our XML layout.
To achieve this, we use the following lines of code:
var startForResult = registerForActivityResult(
        StartActivityForResult()
    ) { result ->
        if (result != null && result.resultCode == RESULT_OK) {
            assert(result.data != null)
            val matches = result.data!!.getStringArrayListExtra(RecognizerIntent.EXTRA_RESULTS)
            binding.textOutput.text = matches!![0].toString()
        }
    }
}
The lines of code above check the request code and ensure that the activity returned is not null and then stores the words into an ArrayList.
The text from the speech recognizer is then set to the text view in the card view for display.
Here is the full Kotlin code in the ActivityMain.kt file:
import android.content.Intent
import androidx.appcompat.app.AppCompatActivity
import android.os.Bundle
import android.speech.RecognizerIntent
import androidx.activity.result.contract.ActivityResultContracts.StartActivityForResult

class MainActivity : AppCompatActivity() {
    private lateinit var binding: ActivityMainBinding


    override fun onCreate(savedInstanceState: Bundle?) {
        super.onCreate(savedInstanceState)
        binding = ActivityMainBinding.inflate(layoutInflater)
        val view = binding.root

// Click listener to launch the speech recognition intent
        binding.voiceButton.setOnClickListener {
            val speechIntent = Intent(RecognizerIntent.ACTION_RECOGNIZE_SPEECH)

// Intent Extra to model the speech recognition
            speechIntent.putExtra(
                RecognizerIntent.EXTRA_LANGUAGE_MODEL,
                RecognizerIntent.LANGUAGE_MODEL_FREE_FORM
            )
            speechIntent.putExtra(RecognizerIntent.EXTRA_PROMPT, "voice output")
            startForResult.launch(speechIntent)
        }
     setContentView(view)
    }

    var startForResult = registerForActivityResult(
        StartActivityForResult()
    ) { result ->
        if (result != null && result.resultCode == RESULT_OK) {
            assert(result.data != null)
            val matches = result.data!!.getStringArrayListExtra(RecognizerIntent.EXTRA_RESULTS)
// Set the speech recognition output text to the XML layout text view
            binding.textOutput.text = matches!![0].toString()
        }
    }
}
I hope this tutorial helps you integrate speech recognition into your Android app. Check this documentation to learn more about how to customize the speech RecognizerIntent class.
Which methods have you used to integrate the speech to text in your Android app? Kindly share your thoughts in the comment section.